
How to make a Resin Bowl
Resin Bowl Tutorial
We love this step by step tutorial with all the tips you need to make your very own resin bowl. Thank you so much to Resin for Beginners for this fantastic blog post. You can find lots more brilliant tips and advice about all things resin on their blog page
Epoxy resin bowls can be a really satisfying project and they are easier than they look to make. We talk you through the step by step process, but your imagination can let you create some really unique pieces.
Project difficulty: Medium
Project time: 12 hours with fast cure resin, 24 hours with general purpose resin
What you’ll need
Epoxy resin
We used 1:1 ratio Apex Fast Cure Resin for this project. It means that we could pour and within a few hours our resin was ready to mould in to shape. It really sped up our project and meant that we could keep checking back to see when it was ready to come out of the mould. Most fast cure resins will be touch dry in 2-3 hours (depending on the amount of colour and texture / ad-in’s you use) and will be fully cured in 24 hours.
Silicone Mould
You’ll need a large round silicone mould for this project. We recommend not getting something too deep as it can be difficult to bend thicker pieces in to shape. We bought this mould from Amazon which is 11.8 inches wide and 0.43 inches deep.
Large bowl
We used one of our silicone kitchen bowls. You can use your empty mould to hang over to fit in to your bowls before you pour your resin so that you can get an idea of how it might look.
Colours and or ad-ins
Adding mica powder or alcohol inks can help you crate some truly unique pieces. Just remember that as a rough guide, you should add no more than 10% colour to your resin (so 10% maximum colour to 90% clear mixed resin). If you add too much you could risk the resin not curing properly.
How it’s done
Mix your resin
Mix your resin according to the instructions. We recommend using kitchen scales to ensure your ratios are absolutely correct. Again, incorrect ratios can be a reason your resin might not fully cure or remain bendy and sticky. We used around 400ml of resin for this project. You can check your exact measurements by filling a large jug of water, measuring it (A), filling your mould with the water from the jug, measuring it again (B) and calculate the difference between (C).
A – B = C
e.g. 500ml-100ml = 400ml
*C = the amount of resin you will need in total.
Add in your colour
To add your colour, split your resin in to separate cups as per the number of colours you would like to use.
Pour your resin
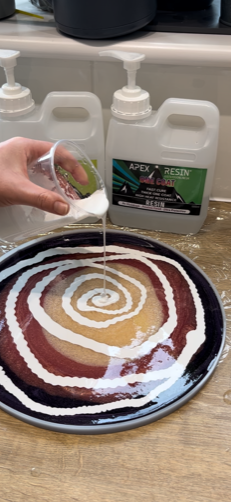
This is where you can be as creative as you like. You can pour in any pattern you like. We like to pour a little at a time to experiment how the colours mix together. Remember that as resin cures, it will naturally pull in colour from the sides and blend to create some amazing patterns. Your finished piece will always look different to how it has been poured.
Eliminate bubbles
We used Isopropanol spray for this project but you can check out our blog on ‘How to get rid of bubbles in your resin’ for more ideas on how to tackle this annoying issue. We recommend that you keep an eye on your resin for at least the first half hour. Bubbles can sometimes keep appearing as your resin settles and you can find bigger bubbles might need popping especially toward the end of your resin’s working time.
Let cure to touch dry
Once you’re happy with the way your resin looks, let it cure so that it is touch dry. You should be able to easily remove the resin from the mould. Check this by carefully pealing back an edge. If it comes away cleanly, you should be able to remove your piece.
Create your bowl shape
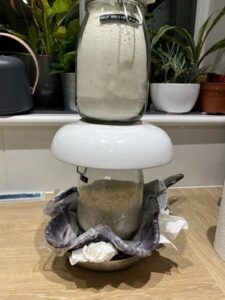
You can either lay your resin over an upturned bowl or push it in to the middle of a bowl (which is what we did here). We used kitchen roll to create the defined edges and placed some heavy objects from around the house (you can also get creative here!) to push some depth in to our resin bowl.
Don’t rush it!
Don’t be tempted to remove your bowl too early. Make sure you let it sit for your resin’s full cure time. If you take your piece out too early, it will loose its shape and can be difficult to get back in to position. Patience is key as always with resin!
Thank you so much for this fantastic tutorial. Find lots more tips at Resin For Beginners
Mar 21, 2024

