Top Tips for Resin Art Beginners
Which resin to use, how to mix and more!
With Helen from @the_resin_rainbow
Thank you so much to Helen for her top tips and advice for beginners starting their exciting journey into resin art! You can shop Helen's beautiful creations and find out more about her by visiting her store The Resin Rainbow

My name is Helen and I'm a self-taught resin artist living in South Wales in the UK. I began creating with resin in 2020 and have been in love with it since. As the name of my store would suggest, I love all things to do with colour and sparkle - the brighter the better!
Which resin for which project?
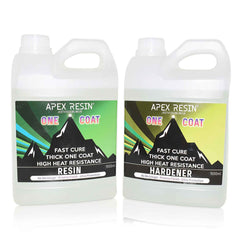
If you are going to create artwork or top coat an item, then a thicker viscosity resin is better as this won't flow as fast and will remain on top of the item you are coating. Just4you have a resin for this purpose called 'Apex One Coat' (linked here) which is a lovely thick resin and is also heat resistant to 120 degrees Celsius, making it perfect for top coating coasters as well. Thicker resins tend to hold on to more bubbles when mixing but we will discuss bubbles in resin further down.
If you are pouring into a shallow mould then a thinner viscosity casting resin is better, as this will flow easily into any corners or details in the mould and will also have less bubbles than using a thicker resin. The resin that fits this bill from is the 'Apex High Gloss' (linked here) and it's also heat resistant to 90 degrees Celsius.

If you are pouring into a deeper mould or a very large mould, it's important to use a slow curing resin. When resin is poured in excessively large amounts the exothermic reaction can speed up and the resin can get too hot, something that is known as a flash cure. Flash cures need to be avoided as they can release smoke and vapours from the resin as well as melting and damaging the silicone mould. Slow curing resins are often known as deep cast or deep pour resins. From Just4you there is 'Apex Deep Cast' resin (linked here) which can be poured up to 30cm in one go. These resins can take a few days to cure but have exceptional clarity and minimal bubbles so give a wonderful glass-like finish.

For adding small details to resin, or for creating jewellery, a good option is UV resin. This often comes in small bottles with a nozzle for precision application but can also be poured from the bottle and mixed with glitters and colours as with other resins. UV resins can cure in bright sunlight or can be cured under a UV lamp. 'Apex UV' resin (linked here) is perfect for projects such as this.
How to avoid bubbles in resin
The Apex Resins all have excellent bubble releasing technology which means that any bubbles will rise to the surface and can be popped.
However, bubbles in resin are completely normal and are produced by mixing and also by the exothermic reaction.
They can be reduced and got rid of in most instances through the following methods:
1) In colder weather, warm the resin (NOT the hardener). This reduces the viscosity of the resin and therefore the bubbles that will be trapped.
2) Mix slowly. In baking, you often want to whisk air into the mixture but in resin, you want the opposite so stir the resin slowly to keep bubbles to a minimum.
3) Let the resin sit for 5 - 10 minutes before pouring. This encourages any bubbles to rise within the cup and these can be dealt with before pouring into the mould. To pop bubbles, use a long-handled lighter or craft blow torch for the best and quickest removal but don't hold the flame over the resin for too long or too closely as this can scorch the resin. A small blast of heat is all that is needed to pop the bubbles.
4) After pouring into your mould, use a cocktail stick or silicone tool to free any bubbles from the edge and encourage them to the surface where they can be popped.
Be sure not to over heat the resin to try and get rid of bubbles as this can not only damage the resin but can also damage your mould and in some instances, cause the resin to fuse to the mould rendering your whole item destroyed.
However it is also important to remember that bubbles make your resin item unique and can add little pops of beauty to your pieces in their own special way.
Measuring
This is one absolutely crucial element to get right. Don't eyeball or guess - you need to be accurate! If you don't measure correctly, you can be sure that your resin project won't turn out as you hoped, maybe because it won't cure or flash cures, has sticky spots or a tacky finish. Read the instructions for your resin carefully and follow them to the letter. Some resins are measured by weight, some by volume and some can be either. Apex Resin is measured by volume so I used a graduated measuring cup, which can be plastic or silicone.
All resin measurements follow a ratio for mixing e.g. 1:1 or 2:1 etc. 1:1 mixtures are obviously the easiest because whatever you pour of one, you'll pour of the other. Remember that the total volume / weight for the mould is the resin and hardener combined. If, for example, your mould takes 200ml of resin to fill then you would need 100ml of resin and 100ml of hardener (if using a 1:1 ratio by volume). In my experience, it's always better to mix up slightly more than you'll need, just in case!
Leftover resin can always be poured into another mould but if you don't have enough, it's always a panic to get more mixed up and tinted to the exact same shade before your first pour starts to change temperature.
When starting out, you may prefer to measure each component in separate cups before adding to your mixing pot to ensure you don't over or under measure. As you get more experienced you may then choose to pour both components into one container, which is how I choose to measure as it makes the final clean up easier! Whichever you do, measure accurately and take your time!
Mixing
Once you have measured your resin and hardener, they need to be mixed together thoroughly. If you've measured them in separate cups, pour them both into a new container, ensuring you scrape them both out as much as possible. If you've poured into the same pot to start with then that step is already done.
You can mix with a silicone mixing stick or a wooden lollipop stick. Be sure to stir slowly. We talked about bubble prevention in part one and stirring is one part of the process that can create plenty of unwanted bubbles if you aren't careful.
When you start stirring you will notice that the resin is cloudy and full of streaks. This is normal as this is the two components starting to come together. A general guide time for mixing is around three minutes so if you are new to resin, set a timer, as three minutes is actually quite a long time! It's important when you are mixing to scrape your mixing tool around the bottom and sides of your cup. The resin component can stick to the cup which you can't see but your resin won't be fully mixed which can again affect curing. When doing this, you may see what look liked streaks of gel in your cup again and this is a sign that you need to mix further.
At the end of three minutes, your resin should look crystal clear and if you scrape the sides and bottom of the cup, you shouldn't see any more streaks appear. Sometimes it takes longer than three minutes depending on your room temperature but that's fine - observe your resin closely and when it is completely clear and streak free, you will know it is fully mixed and ready to use.
Adding colours / glitter
Resin in its base form is clear so to get those lovely colours and sparkles, we need to add pigments or glitters. Now there is a huge range of choice out there but I would definitely advise that for colour, you stick to pigments and powders that have been tested and approved for use in resin. Mediums like acrylic paint can be used but they can affect the resin's cure and finish so epoxy pigment pastes and mica powders are always better to use, as these have been designed for using with resin. There are also alcohol inks and resin inks or dyes which can give wonderful effects in resin also.
The pastes and powders can be metallic, pearlescent, opaque, transparent or even glittery. Just4you have an excellent selection of pigment pastes, mica powders, glitters and dyes. The amount you need to add is important as, again, it can affect the cure of the resin. A general rule is 1 part pigment to 10 parts resin. I tend to use the tip of a lollipop stick and gauge how much to add by looking at the amount of resin I have measured. If for example, I have only measured a small amount such as 30ml, I will only use a tiny scoop on the very tip of the lollipop stick. If I have measured a larger amount such as 200ml, I will use a more heaped scoop. As with seasoning in cooking, you can always add more but you can't take away, so start with a small amount and add more until you get the required colour.
Glitter is a little more complex. You can stand to add a little more glitter than colour but again, start small and add more as needed. The best way to learn how much to add is through trial and error.
Alcohol inks can either be dropped into resin and mixed to create a transparent colour or dropped onto the top of resin to create wonderful effects. If a white alcohol ink or pigment is then dropped on top of the colour, petri effects can be created which is almost magical to see!!! One important note here is do NOT use a naked flame to get rid of bubbles. Alcohol ink is flammable and you do not want a fire on your hands!
Moulds
The most common material to pour into is a silicone mould as these are the easiest to come by and to release. They can be obtained from many places and come in a variety of shapes and styles, from coasters, to placemats, to candle holders to ornaments. Plastic moulds can also be used but these can be difficult to release and depending on the quality, may not withstand the warmth of the resin as it cures and may warp or fuse to the resin itself. For any mould, you can use a mould release spray but personally I have found that if you use a silicone mould and don't over torch your resin after pouring, you shouldn't have any troubles demoulding.
It is worth noting that some moulds have intricate designs or edges and corners than can trap bubbles. You can either gently squeeze points and corners to get rid of the bubbles, use a cocktail stick to coax them free or spray the mould with isopropyl alcohol, although this is something I rarely do myself. For intricate moulds it is better to use a low viscosity resin such as Apex High Gloss (here) or Apex Deep Cast (here), as these will fill the details easily and any bubbles will generally release themselves.
Demoulding
After leaving the resin to cure for the time stated check it is fully cured by gently tapping the exposed surface and slightly squeezing the mould. I often press a fingernail against a small area of the resin item. If a dent is left, it needs longer to cure but if no mark is left you are ready to demould. This is always exciting and it's so exciting to see what you have created. Sometimes, what you intended turns out differently but every make is beautiful and unique in it's own way. If things have not gone to plan, then use your next pour to try and do things differently.
There we have it! You should be ready to start your own resin journey now. Enjoy the process and don't look at mistakes as failures, look at them as learning experiences or, in the words of Bob Ross, 'happy accidents!'
Helen @the_resin_rainbow